# Linux Installation
# Ubuntu 19
# Get Started
Open a terminal and create a SSH connection to your workstation or server.
Update your package manager repositories before starting, by using the following command.
sudo apt update
# Install Microsoft dotNet Core Components
- Add the Microsoft repository and key, by running the following commands
wget -q https://packages.microsoft.com/config/ubuntu/19.04/packages-microsoft-prod.deb -O packages-microsoft-prod.deb
sudo dpkg -i packages-microsoft-prod.deb
sudo apt update
- Install the APT Transport HTTPS package, by running the following commands
sudo apt install apt-transport-https
sudo apt update
- Install the dotNet Core 2.2 Runtime, by running the following commands
sudo apt -y install dotnet-runtime-2.2 aspnetcore-runtime-2.2 dotnet-sdk-2.2
- Run the following command and ensure that text similar to "2.2.XXX" is displayed
dotnet --version
# Install Microsoft SQL Server
- Import the Microsoft repository GPG key, by running the following command. This should return "OK" to the console.
wget -qO- https://packages.microsoft.com/keys/microsoft.asc | sudo apt-key add -
- Register the Microsoft SQL Server Ubuntu repository, by running the following command.
sudo add-apt-repository "$(wget -qO- https://packages.microsoft.com/config/ubuntu/16.04/mssql-server-2019.list)"
sudo apt update
- Run the following command to install Microsoft SQL Server
sudo apt install -y mssql-server
- Run the following command to start the configuration wizard for Microsoft SQL Server
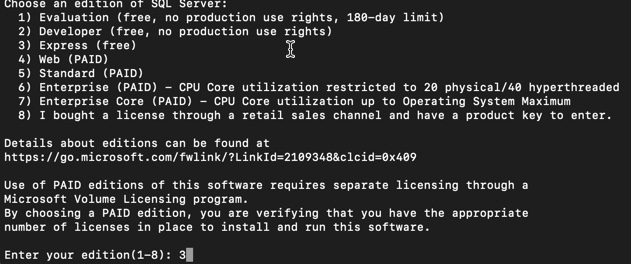
sudo /opt/mssql/bin/mssql-conf setup
Press '3' for Express edition, followed by <Enter>.
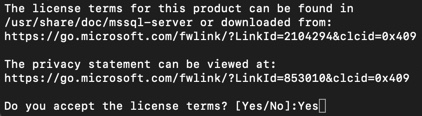
Review the licence terms and type 'Yes' and press <Enter> if you agree.
Enter a secure 'sa' (system administrator) password, then press <Enter>.
TIP
This can be different to the password you authenticate to your computer or server with.
Re-enter the password to confirm, then press <Enter>.
Wait while SQL server configures, this may take some time.
# Install Nimbus
- Download Nimbus with the following command. Substitute the <URL Provided To You Goes Here> with the URL that was sent to you via email.
cd /tmp
wget <URL Provided To You Goes Here>
- Run the following command to extract the archive
sudo mkdir /opt/nimbus && sudo unzip /tmp/Nimbus_Linux* -d /opt/nimbus && cd /opt/nimbus
- Create a log directory by running the following command
sudo mkdir /var/log/nimbus && sudo chmod 775 /var/log/nimbus
- Run the following command to edit the application settings
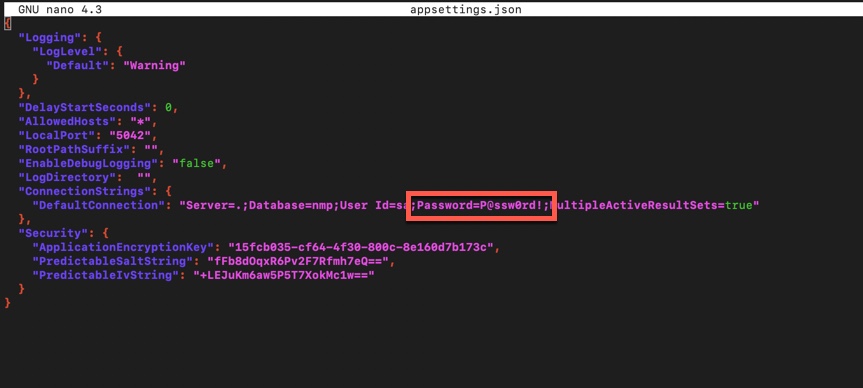
sudo nano appsettings.json
- Update the following;
- Set the password in the connection string, to the one you set in the Microsoft SQL Server installation process.
- (Optional) Set the UserId to a different user Id if you have configured a seperate SQL User account.
- Set the "LogDirectory" to "/var/log/nimbus"
Press CTRL+X, Y, <Enter> to save the changes
Prepare file permissions by running the following command
sudo chmod -R 775 /opt/nimbus
sudo chmod +x /opt/nimbus/Vendor/Cloudflare/linux/nmp_cloudflared
- Run the following command to ensure Nimbus starts. Nimbus will take up to 5 minutes to start, it is ready when "Application started. Press Ctrl+C to shut down." is output to the command line.
sudo dotnet NMP.dll
- Press CTRL+C to terminate the Nimbus process.
# Start Nimbus on Boot
- Create a service account to run Nimbus under
sudo adduser --disabled-password --gecos "" nimbus
- Change Nimbus directory file permissions
sudo chown -R nimbus:root /opt/nimbus
sudo chown -R nimbus:root /var/log/nimbus
- Run the following command to create the service file
sudo nano /etc/systemd/system/nimbus.service
- Copy and paste the following configuration
[Unit]
Description=Nimbus Client

[Service]
WorkingDirectory=/opt/nimbus
ExecStart=/usr/bin/dotnet /opt/nimbus/NMP.dll
Restart=always
RestartSec=10
KillSignal=SIGINT
SyslogIdentifier=nimbus
User=nimbus
Environment=ASPNETCORE_ENVIRONMENT=Production
Environment=DOTNET_PRINT_TELEMETRY_MESSAGE=false

[Install]
WantedBy=multi-user.target
- Run the following command to enable and start the service
sudo systemctl enable nimbus.service
sudo service nimbus start
# Login to Nimbus
See this guide for how to login.
# Setup your Profile
See this guide for how to setup your profile.
# View Service Logs
To view service logs, run the following command.
journalctl -fu nimbus.service
# CentOS 7
# Get Started
Open a terminal and create a SSH connection to your workstation or server.
Update your package manager repositories before starting, by using the following command.
sudo yum update
# Install Microsoft dotNet Core Components
- Run the following command to register the Microsoft key and feed.
sudo rpm -Uvh https://packages.microsoft.com/config/centos/7/packages-microsoft-prod.rpm
- Install the dotNet Core 2.2 Runtime, by running the following commands
sudo yum -y install dotnet-runtime-2.2 aspnetcore-runtime-2.2 dotnet-sdk-2.2
- Run the following command and ensure that text similar to "2.2.XXX" is displayed
dotnet --version
# Install Microsoft SQL Server
- Register the Microsoft SQL Server Ubuntu repository, by running the following command.
sudo curl -o /etc/yum.repos.d/mssql-server.repo https://packages.microsoft.com/config/rhel/7/mssql-server-2017.repo
- Run the following command to install Microsoft SQL Server
sudo yum update
sudo yum install -y mssql-server
- Run the following command to start the configuration wizard for Microsoft SQL Server
sudo /opt/mssql/bin/mssql-conf setup
Press '3' for Express edition, followed by <Enter>.
Review the licence terms and type 'Yes' and press <Enter> if you agree.
Press '1' then <Enter> to select English as the language.
Enter a secure 'sa' (system administrator) password, then press <Enter>.
TIP
This can be different to the password you authenticate to your computer or server with.
Re-enter the password to confirm, then press <Enter>.
Wait while SQL server configures, this may take some time.
# Install Nimbus
- Download Nimbus with the following command. Substitute the <URL Provided To You Goes Here> with the URL that was sent to you via email.
cd /tmp
wget <URL Provided To You Goes Here>
- Run the following command to extract the archive
sudo mkdir /opt/nimbus && sudo unzip /tmp/Nimbus_Linux* -d /opt/nimbus && cd /opt/nimbus
- Create a log directory by running the following command
sudo mkdir /var/log/nimbus && sudo chmod 775 /var/log/nimbus
- Run the following command to edit the application settings
sudo nano appsettings.json
- Update the following;
- Set the password in the connection string, to the one you set in the Microsoft SQL Server installation process.
- (Optional) Set the UserId to a different user Id if you have configured a seperate SQL User account.
- Set the "LogDirectory" to "/var/log/nimbus"
Press CTRL+X, Y, <Enter> to save the changes
Prepare file permissions by running the following command
sudo chmod -R 775 /opt/nimbus
sudo chmod +x /opt/nimbus/Vendor/Cloudflare/linux/nmp_cloudflared
- Run the following command to ensure Nimbus starts. Nimbus will take up to 5 minutes to start, it is ready when "Application started. Press Ctrl+C to shut down." is output to the command line.
sudo dotnet NMP.dll
- Press CTRL+C to terminate the Nimbus process.
# Start Nimbus on Boot
- Create a service account to run Nimbus under
sudo adduser nimbus
- Change Nimbus directory file permissions
sudo chown -R nimbus:root /opt/nimbus
sudo chown -R nimbus:root /var/log/nimbus
- Run the following command to create the service file
sudo nano /etc/systemd/system/nimbus.service
- Copy and paste the following configuration
[Unit]
Description=Nimbus Client

[Service]
WorkingDirectory=/opt/nimbus
ExecStart=/usr/bin/dotnet /opt/nimbus/NMP.dll
Restart=always
RestartSec=10
KillSignal=SIGINT
SyslogIdentifier=nimbus
User=nimbus
Environment=ASPNETCORE_ENVIRONMENT=Production
Environment=DOTNET_PRINT_TELEMETRY_MESSAGE=false

[Install]
WantedBy=multi-user.target
- Run the following command to enable and start the service
sudo systemctl enable nimbus.service
sudo service nimbus start
# Login to Nimbus
See this guide for how to login.
# Setup your Profile
See this guide for how to setup your profile.
# View Service Logs
To view service logs, run the following command.
journalctl -fu nimbus.service